Popular Posts

Showing posts with label Harvest. Show all posts

Saturday, September 27, 2014

Carrots (Daucus carota)

Peter Rabbit was one of my favorite stories as a child. He was such a naughty little rabbit. He disobeyed his Momma and went to Mr. McGregor's garden.  I think he saw the beautiful carrots growing there and  couldn't help himself.

We have been digging carrots and cleaning up the garden for fall.   I like to grow a couple of different varieties, it was kind of fun uncovering them and seeing the color and how big they grew this year.  

Why not leave them in the ground, you ask? I noticed some of them had rust fly damage and I wanted to preserve some of our hard work before the bugs got to all of them.


I did something a little different this year and I think it helped them grow bigger.  I used a rake and pulled the soil up into a bed in the garden before planting the seeds. 


 Once dug up we twisted the tops off and washed them. Can you see the orange, red, and yellow (sometimes white) carrots in the wheel barrow?

Here are some clean, sorted carrots for the house.  I sort out the smaller ones to eat, the larger ones go in the garage fridge for juice, cooking, or the animals.  Carrots are great food for livestock.


Carrots are considered bi-annuals.  This means that they produce greens and roots the first year, then if not pulled up (and not killed by frost) they will bloom and produce seeds the next year. 

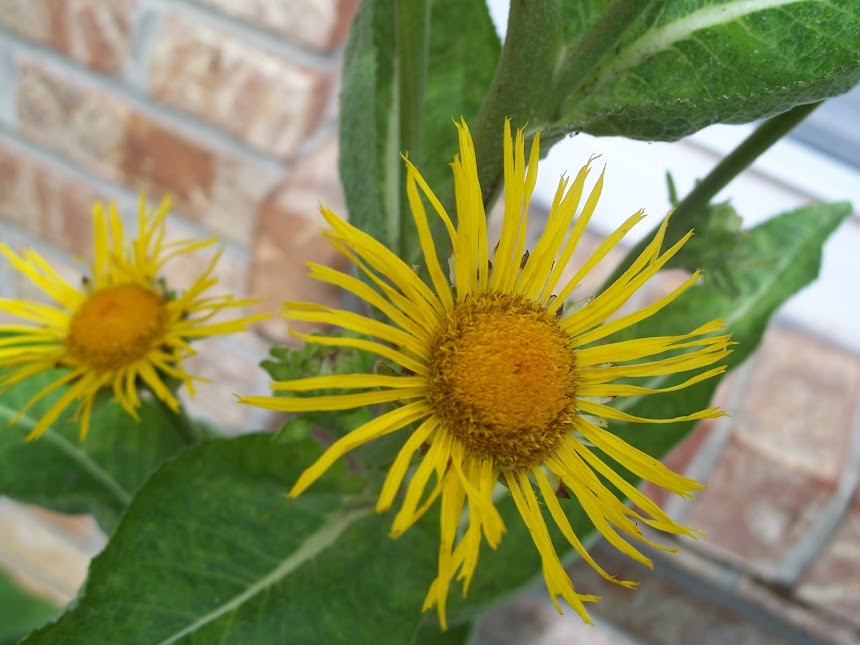
Weird thing, some of our carrots actually bloomed this year............I'm still trying to figure that out.  The flowers of a carrot look a lot like Queen Annes Lace.  Most likely because the two plants are in the same family.


This is one of the plants in bloom. If you are wanting to save seed and live in a temperate climate, you can leave the carrots in the ground and collect the seed the second year.  Gardeners that get enough frost to kill the carrots have to bring them in and over-winter them.  In the spring they re-plant the carrots they want seed from. 

I was going to let this guy go to seed but went out a couple of days later and my husband had pulled it.  Guess I will be ordering more carrots from Baker Creek Seeds this winter ;-)


Showing off the "big" one.


Here's a pail for the crisper.  I place them in the crisper and cover them with a damp towel. They will keep forever like this..ok, not forever, but a very long time.  They won't last that long though since the family really likes carrots. 


Getting back to Peter Rabbit, I watched a movie about Beatrix Potter called Miss Potter that was an excellent story about her life. If you get a chance and you liked Peter Rabbit as a child, you should watch it.

Do you have any carrot stories to share?                                                                                               


Thursday, August 21, 2014

Harvesting and drying rose hips

Rose hip

  • The rose hip, also known as rose haw or rose hep, is the fruit of the rose plant, that typically is red-to-orange, but ranges from dark purple to black in some species. Rose hips begin to form after successful pollination of flowers in spring or early summer, and ripen in late summer through autumn.


I picked the rose hips off our Rosa Rugosa bushes.  Truth is your supposed to wait until the first frost.  Rumor is that the frost makes them softer and sweeter.  Our rose hips were getting soft and some of them were starting to rot on the bush so I made a command decision and we picked them.

Bet you didn't know that picking them is the easy part, did you?  After you get them picked, you get to cut them open and take all the seeds out.  Did you know that rose hips have a TON of TINY seeds in them?  That little fact has been hammered home since it took FOREVER to de-seed them.  I was tempted to grumble but couldn't help but think of how high in vitamin C and how good they are in tea and how much I wanted to try out making rose hip seed oil.

What is the big deal you ask? Rose hip seed oil is full of vitamins, antioxidants and essential fatty acids that are known to correct dark spots and hydrate dry, itchy skin, all while reducing scars and fine lines.

I want to make some to try in our Rose Creme among other things. The actual rose hip seed oil on the market comes from wild roses that grow in Chile.  I'm telling myself that our rose hip seeds are just as good.  If they aren't they have to be close, right?  Next time you see me and my skin is glowing you will know why ;-)

BTW, I put the seeds in a jar with grapeseed oil and placed them in the sun to infuse.

Do you have any experiences with harvesting rose hips or making rose hip seed oil?  Any tips?

Friday, August 15, 2014

All about Elderberry

Elderberry is good to have on the homestead and it is easy to grow, so it you have a spot and use elderberries or would like to, don't worry.  You can do it!

In my opinion elderberries and the flowers are good to have for flu season.  I try to have dried or frozen elderberries on hand at all times to make elderberry syrup with.  I prefer to use frozen elderberries, it seems like the syrup made from it has more elderberry flavor.  In my mind more flavor means more of the good stuff.

I have an older post on making Elderberry and Astragalus syrup here http://raf6.blogspot.com/2012/11/flu-season-and-elderberry-astragalus.html if you would like to make some for your family.  Elderberries are also used to make pie, jelly, and wine.

There are many types of Elderberries, some of them are for ornamental purposes.  If your goal is to produce berries you should stick with Adams, John's, Nova, or York.  Even though some shrubs are self-fruitful they do produce better when planted with another variety so always plant two different kinds.

This website "Edible Landscaping by Charlie Nardozzi" has good information on elderberries and their planting and care.  You can find the website here http://www.garden.org/ediblelandscaping/?page=july_elderberry.  The following is taken from that site.

 Types of Elderberries

  • 'Adams' - This American variety grows 8 to 10 feet tall. The large, juicy, dark purple fruits ripen in August and are great for making pies. The strong branches hold the berries upright. Plant a pollinator variety such as 'Johns' for maximum fruiting. This variety is often sold as 'Adams No. 1' or 'Adams No. 2'. There is little difference between these two selections.
  • 'Black Beauty' - This striking European variety features purple foliage and lemon-scented pink flowers. It grows 6 to 8 feet tall and wide and can be grown in perennial borders or as a foundation plant.
  • 'Black Lace' - This eye-catching European selection looks like a Japanese maple with its dark purple, deeply cut foliage. Like 'Black Beauty', this variety also grows 6 to 8 feet tall and wide, producing pink flowers and dark purple fruits.
  • Johns' - This early-producing American variety produces an abundance of berries that are especially good for making jelly. Growing 12 feet tall and wide, this variety is a good pollinator for 'Adams'.
  • 'Nova' - This American variety can be self-fruitful, but does best with another American elderberry growing nearby. Large, sweet fruit are produced on compact, 6-foot shrub.
  • Variegated' - This European variety has attractive green and white leaves and grows 6 to 8 feet tall and wide. The plant is less vigorous and productive than other elderberry varieties, but the foliage is attractive all season long.
  • 'York' - This American variety produces the largest berries of all the elderberry selections. It matures in late August and only grows 6 feet tall and wide. It pollinates 'Nova' well.


 Our Adam's and York bushes will be three years old this fall and are producing more berries than our family will use this winter.  I have frozen over 2 gallons of berries so far and there are more to pick.  The York bush produces huge umbrells of big, juicy berries. The Adams produces smaller umbrells but is very prolific and is about 7 ft by 9 ft. (That is with me cutting it back this spring.) We let the shrub produce suckers but you can cut them back and shape the bush if you want.

If you plant bushes this fall you should be able to harvest a few come next summer.  Birds like them so you will have to beat the birds to them. One more thing about Elderberries, they are kind of brittle so if you are picking berries don't try to bend a limb down to get the berries or you will end up breaking it off.  We learned that the hard way. Happy planting, happy picking, happy syrup making.


Friday, August 8, 2014

Homemade Tomato Paste~Estratta

This is the yummiest paste, way better than store bought. Not to mention it is hard to find paste in a glass jar if you are concerned about BPA. Even if you do find paste in a glass jar, once you try this you won't want any other kind. Really, I'm not kidding. This stuff is great to add to soups and stews or spread lightly on toast or crackers.  We use this instead of tomato sauce when we make pizza.  It is so rich and flavorful that I can thin a little with water and place on our pizza crust. That way we don't have soupy pizza......nobody here likes that kind of pizza.  Crisp and crunchy please!

In Italy they make "Estratta, or Strattu which is the American version of tomato paste. Now don't get this confused with conserva which is paste however it's not made the authentic Sicilian way. Unfortunately if you live somewhere that the temperatures don't get above 90 degrees for a few days, you will have to resort to conserva.  I have read that conserva is good but Estratta is better because only the sun and the ultraviolet light can break down the lycopene to bring out the best tomato flavor in the finished product. Conserva is made by evaporating the juices in the oven at low temperatures instead of using the sun.

Estratta is finished off out in the hot sun on shallow trays. This evaporates the fluid and condenses all the tomato flavor into a small but mighty package that tastes like sunshine and smells like the best Italian restaurant you have ever eaten in.

The down side to all this, yes there is a down side.  You need A LOT of tomatoes to make a small amount of estratta. The first time I made this I started with around 50 lbs of tomatoes and had 6 pint jars when I was done.  A little does go a long way so those jars will last a while but once you get a taste of this you will not want to run out. You also need to have some time to baby-sit it.  The estratta needs to be kept in the sun to do it's thing so you may be moving it as the day progresses unless you have the perfect location that is in the hot sun all day long. We have animals wandering about so I have to baby-sit mine.

Paste tomatoes work the best for estratta since they have less juice and condense down more quickly.  So start out with tomatoes. Skin  and take the seeds out with the equipment you have on hand.  I happen to have a tomato strainer/skinner that basically juices the tomatoes and spits the skin and seeds out.  It has a hand crank and looks a bit like a meat grinder.  You can scald, skin, and remove the seeds by hand if that is all you have.  Fill a heavy pot with the tomatoes and juice, place on the stove and cook down to 1/3 of original amount.  Add salt to taste.  Some people add other seasoning such as basil, oregano, thyme.  Season to your taste but remember that this is going to evaporate more so the taste will be even more condensed.


I place my tomatoes in a shallow roasting pan, cover with cheese cloth to prevent bug contamination and place on the rail of our back deck in the am and move to the hood of my car in the pm.  I bring it back to our screened in porch for the night. During the day I turn it a few times to expose more moisture to the air and sun.  If you have good hot days and sun it should be ready in 2-3 days.


When it is so thick that you can pick it up in chunks and kind of roll it into a ball you are ready to place it in jars.  Sterilize your jars and rub olive oil in them.  Pack the Estratta into the jars, making sure you get the air bubbles out. Leave 1/4 inch head space and top with olive oil to ensure not air can get to the paste.  You can store this on your shelves or in the refrigerator.  If you store on a shelf, once you open and start using a jar, place it in the refrigerator and try to keep the paste covered by the olive oil, this is what prevents it from spoiling.

Let me know if you try this and what you think.  It is worth the work that goes into making it, I promise!

Sunday, August 3, 2014

Fermented Pesto

It has been a beautiful year for the garden.  Sun, warm days, rain, what more could we ask for.  I was a tiny bit "plant happy " this spring.  Not only did I plant lots of vegetables close together but I also planted maybe a few too many of one thing.  One of those would be basil.  We have basil coming out our ears.  In my opinion it is a good thing, my family is not so sure.  One of the ways we used it this year was to make fermented pesto.  In my opinion anything fermented has to be good for you.....right?  This was very good but did have a fermented flavor to it.  You will have to try it and let me know what you think.

You will need fresh basil, salt, garlic, whey, and spring water for this recipe.  I picked, washed, and drained the basil  leaves. Don't know if you all have this problem at your house but, it seems that every time our lawn gets mowed I have extra grass on my herbs and vegetables.


Place leaves without stems in quart jar, filling 3/4 full.  Add 1/4 cup whey (you can make this recipe without whey, you just ferment longer) place 3 cloves in jar (I used 6 in the second jar) add 1 tbsp sea salt, and fill jar with spring water  until just over the leaves.


Cover with a non-airtight lid.  I use a coffee filter and a rubber band. If you are using whey let sit out 2 days (if not using whey let sit out 12-14 days) then drain half the juice and place in blender. Blend with 1/2 cup walnuts and 1/2 cup Parmesan (we use goat cheese). Once blended slowly add 1/4-1/2 cup olive oil.  This pesto is a little more juicy than regular pesto, you can drain more juice off if you like a thicker consistency. We like it thinner when putting it in pasta and other recipes.....thicker for spreading on crackers.


Fermented Pesto
Fresh basil leaves~Approx 3 cups
1/4 cup whey
1 tbsp sea salt
3 cloves garlic (we like 6 cloves better)
1/2 cut walnuts (pine nuts)
1/2 cup parmesan cheese (soft goat cheese)
1/4-1/2 cup olive oil

Here is the the link to an old post about regular pesto if you want to try it.  http://raf6.blogspot.com/2012/08/pesto.html 
 

Wednesday, July 30, 2014

Saving money by Saving Tomato Seeds


How much do you spend on organic, heirloom seeds or plants every year? If you love planting heirlooms and having a variety in your garden like we do, it can get quite expensive.  Unless I want to try a new variety, it costs me nothing to re-produce beautiful plants from year to year.

Our tomato plants are going gangbusters this year and I am making lots and lots of salsa this week.  If you want to read a post on salsa go here http://raf6.blogspot.com/2012/06/chow-chow-and-salsa.html  At some point in the season  I save some seeds to use next spring and since I already had all the tomatoes out for the salsa, what better time to pick the biggest and nicest looking ones to save seeds from.

Tomatoes don't cross pollinate with other tomato plants you may have in your garden so you can count on getting the tomato you want. You do however, need to make sure you are saving seeds from heirloom tomatoes since hybrids won't produce the same kind of tomato the next year.

Start by picking the biggest, best looking tomato of the variety you want to save and slicing into the seed cavity.  Place seeds and some juice from the tomato into a bowl and let sit out for a couple of days.  Rinse with spring water (not chlorinated) and place seeds on a paper towel to dry.  Once dry place in a cool dry location until spring.....oh, and make to sure to label them or you will end up with tomatoes called Mystery Tomato........a brand we have that produces well for canning.  :-0

Friday, June 6, 2014

Herb harvest and storage

Things are growing like crazy around here.  I waited all winter to see this and revel in it. We have had warm days and rain, that is all it takes to make the plants take off.  I have been trying to stay ahead of the burgeoning growth but have to admit it is impossible this time of year to "get it all done".


It gives me such satisfaction to see the fruit of our labor, stored up and ready to be used to treat ailments or to increase our health. I have been chopping dried herbs and storing them and straining tinctures and glycerites that have been soaking. We make teas and tinctures for wellness and sickness both for us and for our animals. Prevention of illness for the animals and ourselves is a priority here.  I've found that dealing with prevention is much more pleasant than dealing with illness.

This is the time of year to dry the green, above ground parts of herbs.  Preferably right before they flower on a dry sunny day.  In the autumn I will harvest the roots I need.  I tend to take the cuttings mid-morning on a dry sunny day.  I bring them into the house and tie them up with twine and hang them under our stairs in the basement.  Most herbs need to dry out of the sun in a place with good air flow.  You can tell you have good herb quality when the herb is dry if it retains green color and has a good smell when crushed.  Once dried I store in clear glass jars.  If you are storing your herbs away from light you can use clear jars but if you are storing in the light you might want to consider colored jars for storage.  Just like spices, keep your herbs cool and dry to make help them last longer.


This is a picture of our wild bergomot before it blooms.  I have already cut it back and dried the branches twice.  I have enough for our needs so will let it bloom now for our enjoyment.


This is yarrow that we planted last year.  I have yet to harvest it....told you I was behind.  

I did a post on essential herbs to grow and their uses here http://raf6.blogspot.com/2013/02/my-essential-herbs-to-grow-list-part-1.html and here http://raf6.blogspot.com/2013/03/essential-herbs-to-growpart-ii.html.


For more information, contact us through our website at the top of the page.


Saturday, November 10, 2012

Strawberries in November


Ok, I am easily excitable, I admit it.  But I have never picked strawberries in November and if I had I wouldn't expect to pick this many with many more green ones to come.  Now if only the frost will hold off long enough for me to harvest a few more.

I was out gathering eggs, enjoying the sunshine and decided to check the strawberry patch because we have been getting a few strawberries here and there through the fall.  I guess it has been a little while since anyone has checked.  What a nice surprise to brighten an already beautiful day. Can you say yummy, fresh strawberry smoothie?


Monday, November 5, 2012

Dried herbs

 It's time to do some last minute herb drying and storing for the winter.  We are using an old wooden baby gate that we attached to the underside of our basement stairs to hang the herbs on to dry.  This is a nice location because we have a wood stove nearby and with the cooler nights we have been burning some wood.  This has helped to dry our herbs very quickly.  I am trying to beat the frosty nights to a few more herbs for our tea, salves, and tinctures.  You might not be able to see all the herbs in the picture to the left but we have thyme, lemon verbena, lavender, comfrey, candy-apple mint, and rosemary drying on the rack.


This is a picture of our thyme (Thymus vulgaris) all dried and ready to be broken up and placed in a jar for storage.  Thyme is a wonderful addition in many foods but it also has medicinal properties.  Is is often used for colds and throat problems like laryngitis.  Is has antiseptic action so is good in mouthwash and toothpaste and it can be used for parasites as well.  It does need to be used with caution because too much can cause issues with your thyroid and it can cause symptoms of poisoning in large dosages.

This is a picture of fresh comfrey (Symphytum officinale)  that we dry for salves and tea.  Comfrey is high in many vitamins, minerals, and nutrients as well as having a high calcium and protein content.  Some people won't use comfrey internally because some limited testing has shown to cause liver damage in lab rats.  We use it and haven't had any problems but if you choose to use it be aware and do your own research.


This is horehound (Marrubium vulgare) that we started from seed this spring.  It is generally used for cough and bronchial problems but can also be used for skin conditions.  We use it for colds inour house.

 Lemon Verbena (Aloysia triphylla)  is used for cooking when we want to add a lemon flavor.  We also put it in tea and soap or salve to give a lemon scent.
The candy-apple mint goes in our teas and is used in some cold glycerites to give a nice mint flavor and bronchial action to them.  The Rosemary is used in cooking, herbal remedies, and to supplement our goats in the winter.

Wednesday, September 26, 2012

Concord Grape Time


It is time to eat grapes, make pie, jam, jelly, and most of all grape bars!  I grew up eating concord grapes every fall since we were in the Finger Lakes Region where there are a ton of vineyards and wineries.  Concords are a slip-skin type of grape that has a very distinctive taste.  To me, there is nothing like it.  Before we moved, the kids and I would take a day off school to go to the lake and get  a couple of pecks of grapes.  On the drive we would enjoy the fall scenery and nice fresh breezes coming off the lake.  It truly is a breathtaking drive with the leaves coloring up for fall and the neat vineyards on the slopes of the lake.  We could hardly wait to get home and start consuming the juicy, fragrant morsels in our baskets.
I wasn't able to find any Concords last year but this year our co-op offered them.  I couldn't resist, so now we have grapes and it takes me back to those fall drives.  
Grapes will store for a long time if handled correctly and stored in a cool place.  We promptly pulled went through the bunches separating the old "yucky" grapes and the split grapes from them.  The old grapes went in the compost and the split grapes went in a pan to be washed and made into grape sauce.  The later being used to make the most highly prized dessert......grape bars.  Once we had the grapes free of old and split grapes they went into the crisper for eating and making into good food.

I will be posting a recipe for the grape bars in a day or two.


Thursday, July 5, 2012

Tomato and avocado salad plus some odds and ends

I have been eating a lot of tomatoes the last couple of weeks.  Every way you can imagine.  This is one of my favorites.  Tomatoes, green peppers, thin sliced onion, and avocado with drizzled apple cider vinegar or juice from olives and topped with Hawaiian Sea Salt.  The other way to make this good would be to add some fresh herbed feta.


We have been pulling vegetables out of the garden because they are ready to be picked but also because it has been so hot and some things are cooking out there.  A couple of the pumpkins we picked had to be composted because they had cooked a little.  The chickens have enjoyed picking at them so I don't feel so bad.  The one vine that is doing really well is the watermelon but more about that in another post.  We pulled the dry beans and brought them in to finish drying before we shuck them out.  The boys helped me get the bed ready and I re-planted some squash and  green beans, hoping that we will get more before fall.  We planted , watered, and mulched on top of the rows to try and keep some of the sun out.  We had a good crop of onions that I have been using in my canning and we will use through the fall and winter.  I planted white, yellow, and red onions.  They look nice packed in the box together.  I put the Cinderella Pumpkins on top of the refridgerator since that is where I kept our pumpkin all winter and it stored very well.


I also harvested regular pumpkins and spaghetti squash as you can see by the book case.  This old bookcase is in my kitchen downstairs, it is a nice place for my cookbooks, herb books, and nutritional  books as well as a few odds and ends like art supplies and tea sets.

We cleaned out the middle barn before it got too hot, I made more cheese this morning and we canned a few quarts of tomatoes today but I will post on that later.  I started cooking beans in the crock pot to take to an English Country dance Pot-Luck Party tomorrow night.  We can't wait to get together with our friends and have some fun.

Saturday, June 30, 2012

Sun Dried Tomatoes


Remember the post about heirloom tomatoes and my special Principe Bhourgese tomatoes?  The ones I planted from seed specifically to dry.  I finally had the chance to dry them, well I am still drying them since they are very prolific producers.  I almost lost the plants this spring to a late frost.  I was pretty upset until I saw green shoots coming from the lower stems.

I first started thinking I needed to take the skins off the tomatoes to dry them but then read up some on drying them and found out that there are different ways to dry tomatoes.  After taking the skins off the first batch I decided to take the easy route and cut them in half before I placed them on my special drying screen.  Once I cut them I covered them with cheeseclothe and placed the frame in the sun.  It is kind of important to cover the tomatoes because if you don't bugs and flies will be all over them.  The next day I turn them over to get the other side dried.  They are usually ready to go in my glass jar by the end of the second day.  While I was at it I decided to try and dry some of the orange tomatoes as well.  I can't wait to use these in oiled feta or other recipes this winter.  They have such an intense tomato flavor that I'm sure they will bring back memories of harvest and fresh tomatoes when we eat them.


Friday, June 29, 2012

Chow Chow and Salsa


So we continue to put up the harvest around here.  The gardening is becoming more challenging since we haven't had much rain and the next few days are going to be in the triple digits.  The first crop of cucumbers were starting to get yellow so we pulled them up and are hoping the second crop will give us some cucumbers in a couple of weeks.  We picked the green cabbage from the garden but left the purple to grow a little bigger.  The Cabbage Loopers don't seem to prefer the purple cabbage as much as the green.  I will be planting more purple cabbage next year and using a floating row cover to help manage the Loopers better.  I made Chow Chow with the cabbage and extra cukes.

I chopped and sliced Cabbage, Yellow squash, cucumbers, onions, hot peppers, sweet peppers and a few red and yellow tomatoes for color into a big bowl.  This was salted and placed in the fridge overnight.  The next day I drained the juice and started heating the vinegar solution.  Once this was hot, I added the chopped mixture, brought it to a boil and spooned the hot mix into sterilized jars that I sealed.  I have a recipe for the vinegar solution but don't really worry about the amounts of chopped vegetables.  I like to just use up what I have and make extra solution if I need to.  What I have found is that I normally have extra solution left not extra chopped \vegetable since they kind of cook down.  

Chow Chow Solution:
2 cups vinegar (I prefer Apple Cider Vin.)
1 and 1/2 half cups sugar (I sometimes use honey at 1 cup)
2 tsp turmeric
1tsp ginger powder
2tsp mustard seed and mustard powder
2tsp celery seed (I use one since we don't care for a lot of celery seed)
1Tablespoons crushed red pepper (if you are making sweet/hot chow)

If you are just making a sweet chow then exclude the chopped hot peppers in the beginning.  We eat this on sandwiches and I put it in potato and macaroni salad.  It is really good with BBQ too.

I wanted to try a new salsa recipe using chopped zucchini to see how the family would like it so when I was done chopping for the Chow I went ahead and chopped zucchini, salted it, and put it in the fridge overnight.  Not to put the cart in front of the horse the family loved it and didn't complain about the zucchini in the recipe.  Now I have another way to use up the zucchini and provide good food for my family.  I don't have a salsa recipe that I use but can share with you what I put in the mix for our salsa.  I can a  lot of salsa every year since we eat tortilla's and salsa as a snack quite often throughout the year.

3 large Chopped Zucchini (salted and left overnight) drained
Jalepeno's
green peppers
onions
tomatoes (we use all colors)
smoked chipotle peppers
salt (to taste)
vinegar/lemon jc (about 1 cup in a huge bowl of salsa)
paprika (approx. 1/2 c)
Chili Powder (approx. 1/4 cup or a little less)
Tomato paste to thicken
This is for a huge bowl of salsa.
 ~Very Important~ A bag of chips to test the results as you work and also to keep up your strength doing all that chopping.


We have tried different methods over the years but like the results from hand chopping the ingredients so that is what we do.  Once done fill sterilized jars, put lids on, and seal in a hot water bath.  It is also important not to can all the salsa but to keep some to eat for the next couple of days.  Did I mention that I do the canning on the downstairs porch with a Propane stove?  Wonderful not to heat up the house during these hot days.

Sunday, June 24, 2012

Heirloom tomatoes from the garden

 The kids started last night and Pat and I finished picking this basket of tomatoes this morning.  I looks beautiful to me with all the colors in it.  I use the different tomatoes for different purposes.  Some are to eat, well all are to eat, but some will be eaten fresh and others will be dried or canned for later.
Not all of the tomatoes are ripe yet but they will ripen quickly over the next few days.  I picked them because I wanted to make sure I got them instead of a pesky bug, slug, chicken, or the likes.  We placed them on an old table with a porcelain top which we put on the back deck for easy access to the kitchen.  I couldn't help but sort them according to like.

These are Principe Borghese tomatoes that I planted specifically to dry for sun dried tomatoes.  I will post on this in the next couple of days when I get time to do them.  I have dried paste tomatoes before with some luck but read in a seed catalog about these and how they have such good flavor when dried.  We shall see.  Only some people in the family like dried tomatoes.  My theory is if I make something they don't like once in a while and they have to try it, maybe they will learn to like it.  Not to mention how good they are for you.  In Sicily they hang the whole plant up to dry out the fruit in the sun.

The bright orange and yellow cherry tomatoes will be devoured one by one as hungry children and adults happen by, or I may put them in a salad with some red tomatoes for nice color.  The chocolate or Cherokee Purple tomatoes are good sliced with some Black Hawaiian Sea Salt, a slab of mozzarella, and a basil leaf with some balsamic vinegar drizzled over the top.  This is called Salad Caprese.  By the looks we will be harvesting tomatoes for a few weeks, maybe longer if we would get some rain.  Everything is so very dry right now.